
The highest return on a universal design bathroom remodel comes from architectural choices that create invisible accessibility, not from simply adding adaptive equipment.
- Investing in foundational elements like superior waterproofing and reinforced walls provides documented, long-term value that appeals to all buyers.
- Features perceived as ‘luxury,’ such as linear drains and floating vanities, deliver significant ROI by expanding your buyer pool without looking ‘medical.’
Recommendation: Prioritize spending on structural and design-integrated solutions over surface-level additions. This strategy maximizes both immediate safety and long-term resale value by appealing to the broadest market.
A full bathroom renovation represents a significant capital outlay, and for many homeowners, the six-figure price tag can be a major point of hesitation. The conventional wisdom is to add accessible features like grab bars or a walk-in tub to improve safety, and while well-intentioned, this approach often misses the larger financial opportunity. It frames the project as an “aging-in-place” expense rather than a strategic investment designed to maximize your property’s market value. The most common advice focuses on what you add, but the highest ROI is determined by the foundational, architectural decisions you make before a single tile is laid.
The key to a profitable universal design remodel is to create a space that is inherently safe, functional, and beautiful for everyone, regardless of age or ability. This means shifting the focus from conspicuous adaptive aids to “invisible accessibility.” The true value is unlocked not by what a potential buyer sees, but by the underlying quality and forward-thinking design they feel. It’s about building a bathroom that appeals to a luxury buyer, a family with young children, and a couple planning for their future, all at the same time.
This article will break down the critical investment decisions that deliver the highest return. We will analyze the financial impact of choices ranging from the unseen waterproofing system that protects your asset to the type of drain that can add thousands in perceived value. By treating your bathroom remodel as a calculated portfolio enhancement, you can transform a daunting expense into one of your home’s most powerful financial assets.
To navigate these crucial investment decisions, this guide breaks down the key components that directly influence your financial return. The following sections provide a clear analysis of where to allocate your budget for maximum impact on resale value.
Summary: Maximizing Your Bathroom Remodel ROI
- Schluter vs. Hot Mop: Why the Waterproofing System Matters More Than the Tile?
- Comfort Height vs. Standard: Why That Extra 2 Inches Saves Your Knees?
- Wall-Mounted vs. Pedestal: How to Create Knee Space for a Wheelchair User?
- Why You Must Reinforce Walls for Grab Bars Instead of Relying on Towel Racks?
- How to Survive a 3-Week Bathroom Reno When You Only Have One Bathroom?
- Loans or Grants: Where to Find Funding for a $10,000 Bathroom Remodel?
- Why Spending $500 on Lighting Prevented More Falls Than a $5,000 Bathroom Remodel?
- Linear Drain vs. Center Drain: Which Is Best for a Zero-Entry Shower Slope?
Schluter vs. Hot Mop: Why the Waterproofing System Matters More Than the Tile?
While homeowners focus on the visual appeal of tile and fixtures, the most critical component for long-term ROI is the one they’ll never see: the waterproofing system. Water damage is a primary destroyer of home value, and a subpar waterproofing job can lead to catastrophic failures that erase any gains from a remodel. The choice of system is a direct investment in the structural integrity of your property. Modern, integrated systems are not just a feature; they are an insurable asset that savvy buyers and home inspectors value highly. In fact, industry data confirms that there is an 80% ROI for midrange bath remodels that incorporate modern, reliable waterproofing.
From an investment standpoint, the debate between a traditional system like hot-mopping and a modern, bonded system like Schluter is a clear-cut cost-benefit analysis. While hot-mopping has been a standard for decades, it involves more labor, longer cure times, and typically comes with a shorter warranty period. A Schluter system, by contrast, is an engineered solution that creates a fully sealed, vapor-tight assembly with a significantly longer warranty, often exceeding 20 years. This difference in longevity and reliability is a powerful selling point.
The following table illustrates the financial and practical implications of your choice, demonstrating how a modern system can reduce labor costs and increase the long-term, defensible value of your investment.
| System | Installation Time | Warranty Period | Labor Cost Impact | Resale Appeal |
|---|---|---|---|---|
| Schluter System | 1-2 days | 20+ years | 30% less labor | High (modern) |
| Hot Mop | 3-4 days | 5-10 years | Standard | Moderate (traditional) |
| Liquid Membrane | 2-3 days | 15 years | 20% less labor | High (flexible) |
Ultimately, selecting a premium waterproofing system is an investment in peace of mind and marketability. It provides documented proof of quality construction that justifies a higher asking price and assures buyers they are acquiring a durable, low-risk asset.
Comfort Height vs. Standard: Why That Extra 2 Inches Saves Your Knees?
One of the lowest-cost, highest-impact upgrades in a universal design bathroom is the installation of a “comfort height” toilet. Standing at 17-19 inches high, compared to the standard 14-15 inches, these toilets are compliant with the Americans with Disabilities Act (ADA) and offer a tangible benefit to a huge segment of the buyer pool. The seemingly minor two-inch difference significantly reduces strain on the knees and back, making it easier to sit and stand. This isn’t just a benefit for seniors; it’s appreciated by tall individuals, people with temporary injuries, and anyone who values ergonomic comfort. It’s a feature that instantly elevates the perception of the bathroom from ‘standard’ to ‘thoughtfully designed’.
This subtle upgrade is a powerful signal to potential buyers that the home has been modernized with long-term usability in mind. Real estate professionals confirm that buyers respond positively to these thoughtful touches. While it’s just one component, it contributes to an overall impression of quality and care that helps a property stand out.
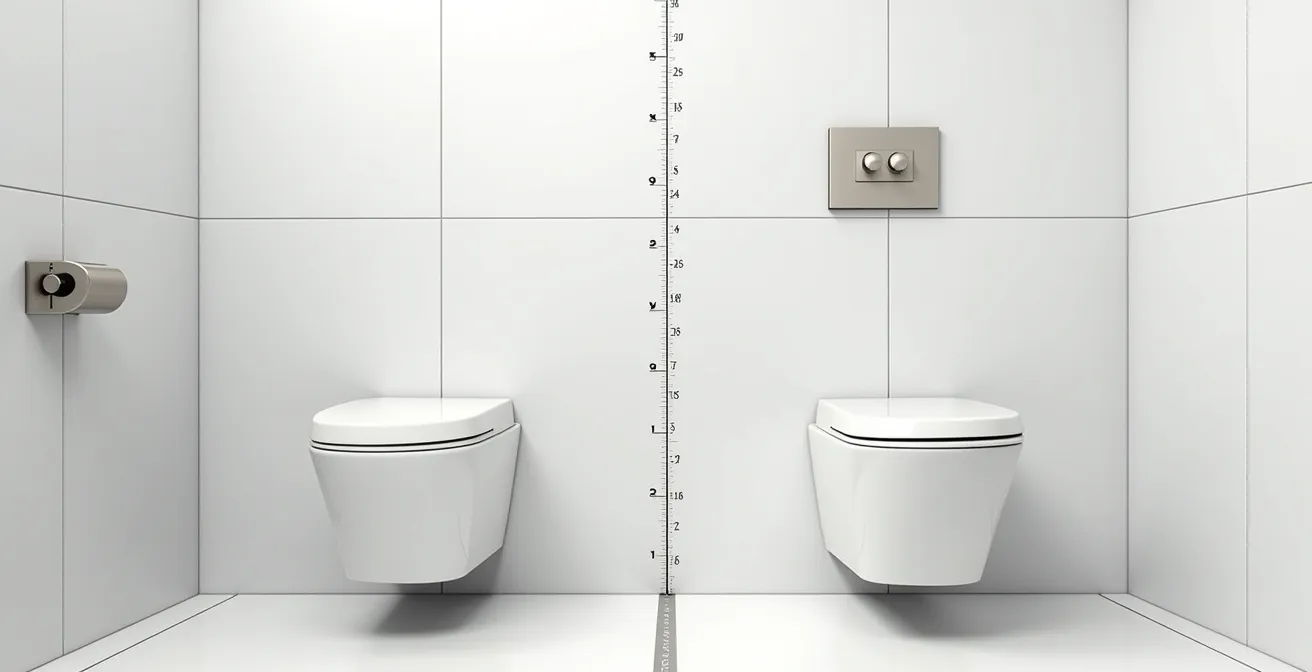
As the image illustrates, the height difference is subtle but ergonomically significant. This single decision expands your home’s appeal with minimal additional cost, typically adding only $50 to $150 to the fixture price. To make the most of this investment, it’s crucial to document it as a value-add feature for marketing purposes.
Your Toilet Height Investment Checklist
- Measure and Test: Evaluate your current toilet’s height and the comfort level for your household to establish a baseline.
- Analyze Demographics: Consider your target buyer. Households with seniors or taller individuals benefit most from 17-19 inches. Families with toddlers might prefer standard height, but the universal benefit of comfort height often outweighs this.
- Assess Local Market: In 55+ communities or areas with aging demographics, comfort height is a de facto standard and a strong selling point.
- Calculate the Premium: Factor in the small price increase ($50-$150) and weigh it against the broad market appeal and ADA-compliant marketing angle.
- Document for Resale: Explicitly mention the “ADA-compliant comfort height toilet” in your property’s feature list and seller’s disclosure to ensure real estate agents and buyers recognize its value.
By choosing a comfort height toilet, you are making a small financial bet that pays off by broadening your home’s appeal and positioning it as a modern, future-ready property.
Wall-Mounted vs. Pedestal: How to Create Knee Space for a Wheelchair User?
The choice of vanity and sink is a defining moment in a universal design bathroom, directly impacting both aesthetics and accessibility. While a traditional pedestal sink can be elegant, it presents a significant barrier for a wheelchair user, offering no knee space for a forward approach. The optimal solution from both a functional and design perspective is a wall-mounted or “floating” vanity. This choice creates open floor space, which not only provides essential clearance for a wheelchair but also makes the entire room feel larger and more architectural—a feature highly prized in modern design.
This design choice moves the bathroom away from a clinical or institutional feel and toward a high-end, spa-like aesthetic. The market recognizes this, and the return on investment reflects it. A recent analysis confirmed that homes featuring floating vanities as part of a universal design commanded a 5-7% premium over traditional pedestal sinks, especially in markets with an aging population. Buyers perceive the feature as a luxury upgrade, not just an accessibility modification, allowing you to market it as “architectural” and “custom.”
Furthermore, this approach represents a smart financial compromise, delivering maximum appeal for a manageable cost. As noted by real estate investment analyst Brian Mollo in his 2025 Cost vs Value Report Analysis:
The floating vanity compromise achieves 90% of wheelchair accessibility goals while maintaining mainstream appeal and costing 40% less than full wall-mounted solutions
– Brian Mollo, 2025 Cost vs Value Report Analysis
By opting for a floating vanity, you are investing in a feature that serves two critical purposes: it provides uncompromising accessibility while simultaneously functioning as a luxury design statement that boosts perceived value far beyond its installation cost.
Why You Must Reinforce Walls for Grab Bars Instead of Relying on Towel Racks?
A towel rack is designed to hold a 5-pound towel. A grab bar is engineered to support a 250-pound person in a moment of crisis. Confusing the two is a common but dangerous mistake. The single most important element for bathroom safety is the availability of secure, properly installed grab bars. Because safety statistics demonstrate that 80% of senior falls occur in bathrooms, installing grab bars is not just a safety measure; it’s a critical risk-mitigation feature that adds tangible value for a huge segment of the homebuying market.
For grab bars to be effective, they must be anchored into solid wood blocking within the wall framing. This reinforcement must be planned and installed before the drywall and tile go up. Simply screwing a grab bar into drywall or tile is a recipe for failure. This “hidden” step of adding blocking is a non-negotiable part of a high-ROI universal design remodel. It transforms the walls into a future-ready platform for safety, allowing grab bars to be added or moved anywhere they are needed, now or in the future.
Moreover, modern design has erased the stigma of institutional-looking grab bars. Today’s options are stylish and multifunctional, serving as towel racks, shelves, or toilet paper holders, seamlessly blending into a luxury aesthetic.
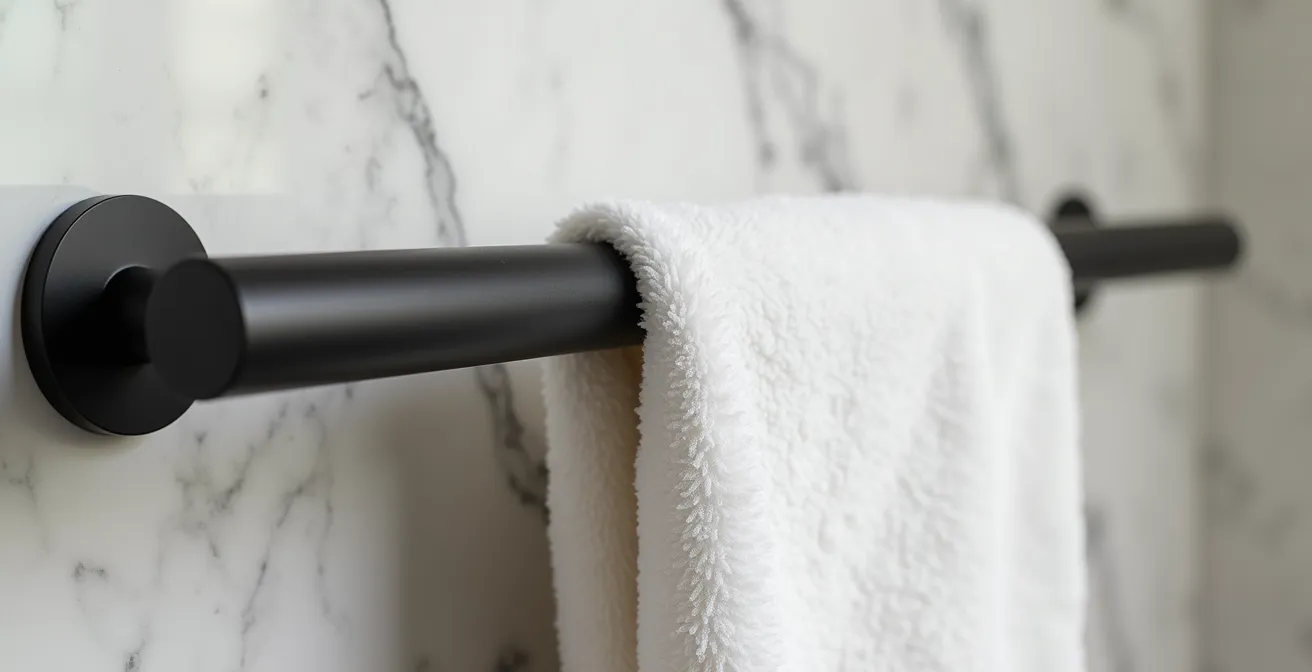
The image above showcases how a grab bar can be a design feature, not a medical device. But this is only possible if the wall is properly reinforced. Documenting this hidden reinforcement is key to capturing its value at resale.
Your Future-Ready Documentation Checklist
- Photograph the Blocking: Take clear photos of all blocking locations after installation but before the drywall is closed up.
- Create a Detailed Map: Draft a simple diagram of the bathroom walls, marking the exact positions of studs and blocking with measurements.
- Include in Disclosures: Add the photos and map to your seller’s disclosure package as proof of superior construction quality.
- Specify Weight Capacity: Note that all locations are reinforced to support a minimum of 250 lbs per grab bar, meeting or exceeding ADA standards.
- Market as “Future-Ready”: Instruct your real estate agent to market this as “future-ready construction,” a premium feature that allows for easy adaptation over time.
By investing in wall blocking, you are creating a “safety-on-demand” platform. This documented, hidden value provides buyers with security and flexibility, a combination that translates directly into a higher perceived and actual home value.
How to Survive a 3-Week Bathroom Reno When You Only Have One Bathroom?
For a homeowner with only one bathroom, the prospect of a multi-week renovation can be the biggest barrier to starting the project. The disruption is a real cost that must be factored into the overall investment plan. However, approaching this challenge with a clear strategy and budget can transform it from a deal-breaker into a manageable inconvenience. The key is to analyze the trade-offs between cost, convenience, and privacy for temporary solutions, and to work with your contractor on a timeline that minimizes total downtime.
Your first step is a financial one: budget for a temporary solution. The options range from a basic portable toilet rental to a comfortable hotel stay. Each has a different impact on your total project cost and your quality of life during the renovation. A clear-eyed assessment of these costs is essential for maintaining control over your budget.
The table below provides a cost-benefit analysis of the most common temporary solutions, allowing you to make an informed decision based on your budget and tolerance for disruption.
| Solution | Weekly Cost | 3-Week Total | Convenience Level | Privacy |
|---|---|---|---|---|
| Portable Toilet Rental | $75-125 | $225-375 | Basic | High |
| Gym Membership | $30-50 | $90-150 | Good | Low |
| Hotel Stay (budget) | $350-500 | $1,050-1,500 | Excellent | High |
| RV Rental (parked) | $400-600 | $1,200-1,800 | Very Good | High |
Beyond budgeting for a temporary solution, your most powerful tool is strategic project management. A discussion with your contractor about a phased renovation can dramatically reduce the time you are without a functioning toilet, which is often the most critical need.
Phased Renovation Strategic Timeline
- Days 1-2: Toilet First. Prioritize the installation of the new toilet. It can be functional by the end of the second day, even as other demolition begins.
- Days 3-5: Shower Demolition. With the toilet operational, the crew can focus on the shower area demolition and rough-in plumbing without a total loss of facilities.
- Days 6-10: Waterproofing and Tile. The most time-consuming phase can proceed while the toilet remains accessible for most of the day (with coordination).
- Days 11-14: Vanity and Fixtures. The vanity, sink, and other fixtures can be installed once the main tile work is complete.
- Day 15: Final Connections. The final plumbing connections are made, and the full bathroom becomes operational.
By planning for the disruption both financially and logistically, you can navigate a single-bathroom renovation efficiently, keeping the project on schedule and preserving your sanity—and your budget.
Loans or Grants: Where to Find Funding for a $10,000 Bathroom Remodel?
Financing a universal design remodel should be approached with the same diligence as any other investment. The source of your capital can significantly impact your total return on investment. Before tapping into savings, it’s crucial to explore funding options that can reduce your out-of-pocket expenses or offer favorable terms, thereby amplifying your net financial gain. Remember, a well-executed project is an asset, and financial analysis shows a $1.71 return for every $1 spent on bathroom improvements. The goal is to maximize this return by minimizing your cost of capital.
The funding landscape ranges from grants, which are essentially “free money” that provides an infinite ROI, to various types of loans that use your home’s equity or your creditworthiness as collateral. Grants, such as those from the Department of Veterans Affairs (VA) or state-level aging agencies, are the most desirable but come with strict eligibility requirements, often tied to disability, age, or income. For those who don’t qualify, a Home Equity Line of Credit (HELOC) is often the next best choice, offering lower interest rates than personal loans because it’s secured by your property.
The following table compares the most common funding sources from an investor’s perspective, focusing on how each impacts your effective ROI.
| Funding Type | Typical Amount | Effective ROI | Qualification Requirements |
|---|---|---|---|
| VA Grants (SAH/SHA) | Up to $22,036 | Infinite (free money) | Service-connected disability |
| State Aging Grants | $5,000-15,000 | Infinite | Age 60+, income limits |
| HELOC (5% rate) | $10,000-50,000 | 69% (after interest) | Home equity, good credit |
| Personal Loan (10%) | $5,000-25,000 | 64% (after interest) | Credit score 650+ |
By thoroughly investigating grants and comparing loan options, you can structure the financing of your remodel to ensure the project not only enhances your home’s safety and appeal but also delivers the strongest possible financial return.
Why Spending $500 on Lighting Prevented More Falls Than a $5,000 Bathroom Remodel?
This isn’t just a catchy headline; it’s a fundamental truth in universal design. The single greatest factor in preventing falls is visibility. A person cannot avoid a hazard they cannot see, whether it’s a small water puddle, a misplaced object, or a change in floor level. While a $5,000 investment in a walk-in tub addresses one specific risk, a $500 investment in a comprehensive, layered lighting plan can mitigate dozens of risks throughout the entire space. From an ROI perspective, lighting is one of the most cost-effective safety and design upgrades you can make.
Effective bathroom lighting is about more than a single bright overhead fixture. It requires a layered approach: ambient, task, and accent lighting working together to eliminate shadows and provide clear visibility at all times of day and night. Crucially, the needs change with age; lighting research indicates that 968 lumens are recommended for those 80 and over, a significant increase from the 646 lumens sufficient for a 60-year-old. A well-designed plan accounts for this with dimmable, strategically placed fixtures.
Implementing a high-ROI lighting strategy does not have to be expensive. It’s about making smart, targeted choices. The following implementation guide provides a blueprint for a layered lighting plan that maximizes safety and aesthetic appeal for a minimal investment.
High-ROI Layered Lighting Blueprint
- Ambient (Overhead): Install a central, dimmable overhead fixture. Choose a 3000K warm white color temperature and ensure it can produce a minimum of 2000 lumens at its brightest setting.
- Task (Vanity): Add vertical fixtures or sconces on either side of the vanity mirror at eye level. This is crucial for eliminating shadows on the face during grooming.
- Accent (Navigation): Install motion-activated LED strip lighting under the vanity toe-kick. This provides soft, indirect light for safe navigation at night without causing harsh glare.
- Controls (Switches): Replace all standard toggle switches with large, rocker-style dimmers. The paddle design is easier to operate for individuals with arthritis or limited hand strength.
- Shower Lighting: Add a waterproof, wet-rated LED light inside the shower enclosure, particularly if you have a niche. This illuminates shampoo bottles and soap, preventing falls from reaching for items in the dark.
By prioritizing a layered lighting plan, you are making a comparatively small investment that delivers an outsized return in both safety and perceived quality, proving that in a bathroom remodel, visibility is value.
Key Takeaways
- The greatest ROI in a universal design remodel comes from ‘invisible’ architectural choices like superior waterproofing and reinforced walls, not just adding features.
- Low-cost, high-impact upgrades such as comfort-height toilets and layered lighting significantly expand your buyer pool and perceived home value.
- Documenting ‘hidden value’—like wall blocking for future grab bars—is a critical step to justifying a higher price at resale.
Linear Drain vs. Center Drain: Which Is Best for a Zero-Entry Shower Slope?
The capstone of a modern, high-value universal design bathroom is the zero-entry or “curbless” shower. This feature removes the trip hazard of a shower curb and creates a seamless, accessible, and profoundly luxurious aesthetic. However, the success of this design hinges on a critical technical choice: the drain. The decision between a traditional center drain and a modern linear drain has a dramatic impact on cost, installation complexity, design possibilities, and ultimately, your return on investment.
A traditional center drain requires the shower floor to be sloped in four different directions, like a funnel. This complex geometry necessitates the use of small-format tiles (typically 4×4 inches or smaller) that can conform to the varied slopes. A linear drain, by contrast, requires only a single, gentle slope in one direction. This fundamental difference unlocks the ability to use large-format, high-end tiles—like 24×24 or 24×48 inch porcelain—across the entire bathroom floor and right into the shower. This creates an uninterrupted, spa-like visual that buyers associate with custom, high-end construction.
While a linear drain has a higher upfront material cost, the value it adds far exceeds the expense. A market study showed that bathrooms with this feature commanded an average 8% price premium over standard designs. Buyers consistently perceived the feature as being worth $3,000-$5,000 in added value, despite an actual cost difference of only $500-$800. It is a perfect example of a small investment creating a disproportionately large perception of luxury.
| Feature | Linear Drain | Center Drain | Impact on Value |
|---|---|---|---|
| Installation Cost | $800-1,200 | $300-500 | Higher upfront |
| Tile Options | Large format possible | Small tiles required | +Luxury appeal |
| Slope Complexity | Single plane | Four-way slope | +Easier install |
| Cleaning Ease | Simple linear wipe | Circular scrubbing | +Low maintenance |
| Perceived Value | High-end/custom | Standard/builder | +$3,000-5,000 |
Armed with this data, your next step is to approach your renovation not as an expense, but as a calculated investment in your property’s long-term marketability and value. By making strategic architectural choices, you build an asset that pays dividends in safety, aesthetics, and a powerful return upon sale.