The 2 inches of extra doorway clearance you need for a walker or wheelchair are often already there, hidden by inefficient standard hinges.
- Instead of costly demolition, a simple hardware swap to offset or swing-clear hinges can reclaim this “hidden geometry” by changing the door’s pivot point.
- This approach avoids the cascading costs and complexities of moving walls, electrical wiring, and refinishing floors and trim.
Recommendation: Before calling a contractor, measure your door’s actual “clear-span width” with the door open and explore the offset hinge solution first.
The sudden need for a walker or wheelchair at home brings a host of unforeseen challenges. One of the most immediate and frustrating is the doorway. That standard 30- or 32-inch opening, once perfectly adequate, becomes a daily obstacle course. The constant scraping, the awkward maneuvering, the sheer effort just to get from one room to another—it’s a problem that feels massive and structural.
The conventional wisdom is swift and daunting: you need to widen your doorways. This usually conjures images of dust, debris, and a contractor’s bill that can easily soar. The conversation quickly turns to reframing walls, moving light switches, and patching drywall, a project that seems wildly out of proportion for gaining just a couple of crucial inches. This approach treats the symptom—a narrow passage—with the most invasive cure possible.
But what if the solution wasn’t about brute force? What if the extra space you need isn’t something you have to build, but something you simply have to unlock? The true key lies not in demolition, but in understanding the hidden geometry of your existing door. By optimizing how your door pivots, you can often gain those critical two inches without ever touching a sledgehammer. This is renovation judo: using the system’s own mechanics to your advantage for a smarter, faster, and dramatically cheaper solution.
This guide will walk you through that clever, cost-saving path. We’ll dissect the real-world clearance requirements, explore hardware-based solutions, and reveal the hidden costs of the demolition-first approach, empowering you to make the most strategic choice for your home and your budget.
Summary: A Homeowner’s Guide to Smarter Doorway Accessibility
- 32 vs. 36 Inches: What Is the Real Minimum Clearance for a Power Wheelchair?
- Barn Doors vs. Pocket Doors: Which Is Easier to Operate from a Seated Position?
- The Hidden Cost of Light Switches: What Happens When You Widen a Doorway?
- How to Match New Wide Frames with Old Baseboards Without Looking Patchy?
- Why You Should Widen the Bathroom Door First, Before Any Other Room?
- AGM vs. Gel Batteries: Which Power Source Lasts Longer in Cold Climates?
- The “2-Foot Rule”: Why Your Hallway Consoles Need to Go Right Now?
- How to Design an Open Floor Plan That Accommodates a Wheelchair Before You Need One?
32 vs. 36 Inches: What Is the Real Minimum Clearance for a Power Wheelchair?
When you start researching accessibility, you’ll immediately encounter the magic number: 32 inches. Indeed, according to ADA accessibility standards, a minimum clear width of 32 inches is required for a single wheelchair user to pass through. This has led many to assume that any doorway measuring less than 32 inches must be demolished and rebuilt. However, this thinking misses a crucial detail: the difference between the “doorway opening” and the “clear-span width.”
The clear-span width is the actual, usable space you have when the door is open to 90 degrees. A standard hinge leaves the door itself protruding into the opening, stealing 1.5 to 2 inches of precious space. A 32-inch doorway might only offer a 30-inch clear span. This is the “hidden geometry” that causes so many problems. Before you can determine if you need 32, 34, or 36 inches, you must first understand what you *truly* have. Power wheelchairs can be wider and less nimble than manual ones, so every fraction of an inch matters. The goal isn’t just to meet a code, but to create a comfortable, stress-free passage.
Instead of guessing, a methodical assessment is your first, most powerful tool. By measuring precisely and identifying the true pinch points, you can make an informed decision, potentially saving yourself thousands of dollars. The following checklist guides you through this critical first step.
Your 5-Step Doorway Clearance Assessment Plan
- Daily Routine Audit: Write out your daily path through the house to identify problem doorways you subconsciously avoid or struggle with the most.
- Precise Measurement: Open the door to a 90-degree angle and measure the clear, unobstructed opening from the edge of the door to the opposite door jamb. This is your true clear-span width.
- Obstacle Hunt: Check for anything that narrows the path further, such as thick door trim, high thresholds, or even doorstops that get in the way.
- Structural Check: Before even thinking about widening, determine if the wall is load-bearing. This single factor dramatically changes the cost and complexity of any modification.
- Hallway Assessment: Remember that a doorway is part of a path. Consider if you have the recommended 48-inch hallway width for turns leading into the doorway.
Barn Doors vs. Pocket Doors: Which Is Easier to Operate from a Seated Position?
When a swinging door is no longer an option, many homeowners are pushed toward two popular—and expensive—alternatives: barn doors and pocket doors. Both solve the problem of an in-swinging door blocking a hallway, but they come with significant trade-offs, especially concerning ease of use from a seated position. A barn door requires the user to reach out and slide a heavy panel along an external track, which can be difficult without upper body strength. A pocket door, while cleaner looking, has a small, recessed pull that can be frustratingly difficult to grasp and operate, especially for individuals with arthritis or limited dexterity.
This image highlights the different body mechanics required for each system.

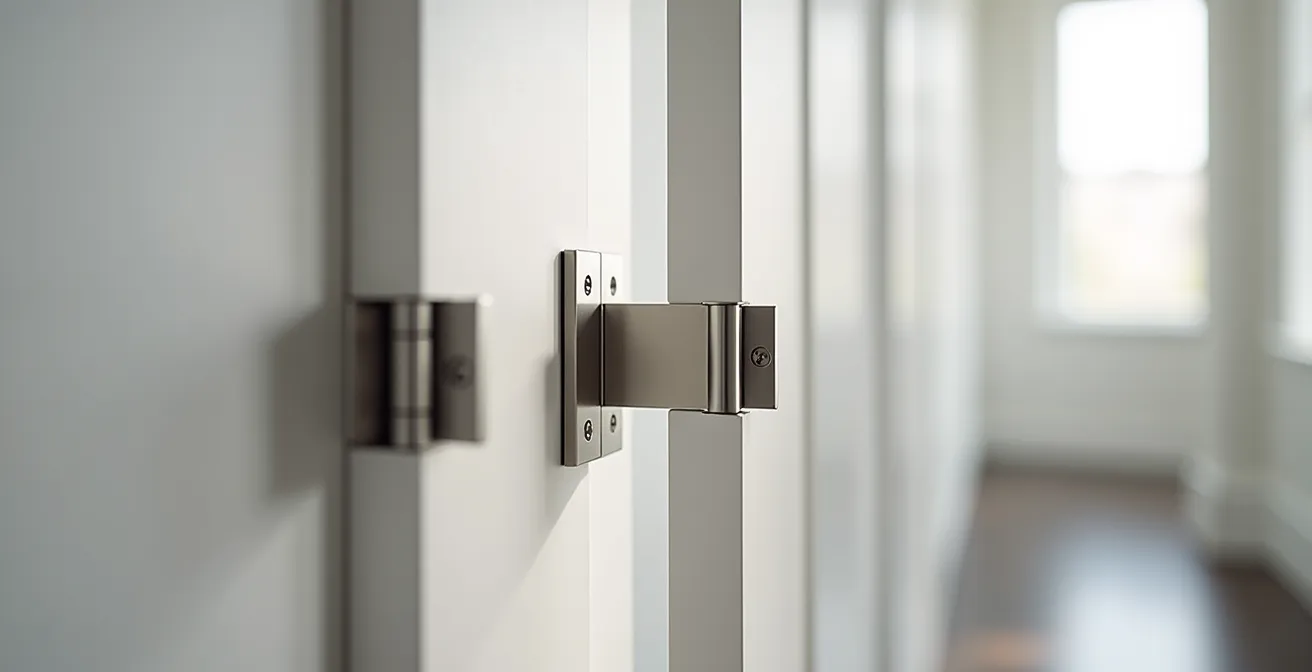
While these solutions look modern, they often require significant construction. A pocket door needs the wall to be opened up to install the hidden cassette, and a barn door requires a long, clear section of wall for the door to slide over. But there’s a third, much simpler option that contractors rarely mention because it’s too easy. As accessibility experts at John Ford Group point out, swing-clear hinges are an excellent alternative. These clever devices, also known as offset hinges, are designed to swing the door completely clear of the doorway. By shifting the pivot point, they add up to two full inches to your clear-span width using your existing door and frame. This is the essence of renovation judo: a small, strategic change that yields a massive result without a fight.
The Hidden Cost of Light Switches: What Happens When You Widen a Doorway?
The decision to physically widen a doorway seems straightforward on the surface. You hire a contractor, they knock out a portion of the wall, install a new, wider frame, and you’re done. Unfortunately, the reality is far more complex and costly. The wall next to your door isn’t just empty space; it’s often a hub for your home’s infrastructure. The most common and problematic obstacle is electrical wiring, specifically for light switches, which are almost always located right next to the door frame for convenience.
Once you decide to add six inches to your doorway’s width, that light switch is suddenly in the middle of your new opening. Relocating it isn’t just a matter of moving a plastic box. It requires an electrician to cut power, pull new wires, patch the old hole, cut a new one, and ensure everything is up to code. This single complication can add hundreds of dollars to the project. And it’s not just switches; you might also find thermostats, security system panels, or even plumbing vent pipes hiding in that small section of wall.
This is where the true cost of demolition reveals itself. The initial quote for framing can quickly balloon. In fact, depending on the complexity, widening a doorway can cost anywhere from $700 to $1,500 once you factor in these “hidden” tasks. This is precisely why the offset hinge solution is so powerful. It works within the existing infrastructure, sidestepping the entire web of complications and costs that lie just beneath the drywall. It’s the difference between a 30-minute DIY hardware swap and a week-long construction project.
How to Match New Wide Frames with Old Baseboards Without Looking Patchy?
Let’s say you’ve accepted the cost and complexity and have widened a doorway. The dust has settled, the new, wider frame is in, and the wall has been patched and painted. You’re almost there, but now you face a nagging aesthetic problem: the baseboards. Your original baseboards ran neatly up to the old, narrower door trim. Now, there’s an awkward gap on either side, and the new, wider trim doesn’t line up with anything. This is one of those small details that can make an expensive renovation look cheap and unfinished.
Matching old baseboards, especially in an older home with unique profiles, can be a frustrating scavenger hunt. You could try to find a perfect match, but that’s often impossible. You could replace all the baseboards in the room for a seamless look, but that adds significantly to the cost and scope of the project. This is another one of the cascading problems that the “simple” act of widening a doorway creates. You solve one problem (width) and create another (aesthetics).
Fortunately, there are several techniques to bridge this gap, each with its own cost and difficulty level. The key is to choose a method that either blends seamlessly or creates a deliberate, professional-looking transition. The following table breaks down the most common approaches.
| Technique | Cost Level | Difficulty | Best For |
|---|---|---|---|
| Direct Matching | High | Medium | Historic homes with unique profiles |
| Plinth Block Addition | Medium | Low | Creating intentional transitions |
| Complete Replacement | Highest | Low | Major renovations |
| Paint Blending | Low | Medium | Minor mismatches |
The easiest solution, of course, is to avoid this problem altogether. By using offset hinges to gain clearance, you never alter the frame, the trim, or the baseboards. The original, seamless look of your room remains perfectly intact—another win for the clever, cost-saving approach.
Why You Should Widen the Bathroom Door First, Before Any Other Room?
If you have to prioritize one single doorway in your home for an accessibility upgrade, make it the bathroom. This isn’t just about convenience; it’s about safety, dignity, and emergency preparedness. The bathroom is often the tightest space in a home, with a narrow door leading into a room filled with fixed, hard obstacles. A fall or medical event in a bathroom can become a critical situation if emergency responders cannot get to the person quickly and easily.
Many standard bathroom doors are only 28 or even 24 inches wide, making them impassable for walkers and wheelchairs. This can lead to unsafe transfers at the doorway or force individuals to rely on bedside commodes, impacting their sense of independence and privacy. For this reason, accessibility experts often recommend a more generous width for this specific door. For instance, the Irish Wheelchair Association suggests doorways should be at least 900mm (about 35.4 inches), providing a comfortable margin for maneuvering.
The urgency is best captured by the experts at O’Flynn Medical, who deal with the real-world consequences of inaccessible spaces. As they powerfully state:
A wider bathroom door can be the difference between a swift, dignified evacuation and a dangerous, complicated extraction by paramedics in a medical emergency.
– O’Flynn Medical accessibility experts, Guide to Making a Home Wheelchair Accessible
This single statement reframes the issue from one of mere home improvement to one of critical safety planning. While a bedroom or kitchen door might be an inconvenience, an inaccessible bathroom door is a genuine liability. Applying the offset hinge trick here can be the most impactful 30-minute project you ever undertake, potentially turning a 28-inch door into a manageable 30-inch passage and drastically improving safety.
AGM vs. Gel Batteries: Which Power Source Lasts Longer in Cold Climates?
Mobility isn’t just about having enough space to move; it’s also about having reliable power to get you there. For power wheelchair users, battery performance is a constant concern, especially in regions with cold winters. Cold temperatures can significantly reduce a battery’s efficiency and range, turning a routine trip into a source of anxiety. The two most common types of deep-cycle batteries used in power chairs are Absorbent Glass Mat (AGM) and Gel, and they behave very differently in the cold.
AGM batteries are known for delivering higher bursts of power, which can be beneficial for overcoming small obstacles or climbing inclines. They generally perform better in the cold than traditional wet-cell batteries. However, their power tends to drop off suddenly when they are nearing depletion. Gel batteries, on the other hand, are renowned for their steady, consistent discharge. While they may not have the same peak power output as AGM, their performance degrades more gracefully and predictably in cold weather, which can be a major advantage for planning longer trips.
Choosing the right battery depends on your typical usage patterns and climate. The following table summarizes the key performance differences in cold weather.
| Battery Type | Cold Weather Performance | Voltage Drop Pattern | Best Use Case |
|---|---|---|---|
| AGM | Better peak power | Sudden drop-off | Short trips, high power needs |
| Gel | Steady discharge | Gradual decline | Long distance, predictable range |
Regardless of the type, proper winter maintenance is crucial for maximizing your battery’s life and range. Simple habits can make a huge difference in reliability when the temperature drops. Consider these tips:
- If possible, store the battery pack in a heated space overnight and only install it just before you leave.
- Pay close attention to the discharge pattern on cold days to better predict your effective range.
- For those in northern climates, investing in batteries specifically rated for cold weather can be a worthwhile upgrade.
- Always keep a fully charged spare battery pack indoors as a reliable backup during the winter months.
The “2-Foot Rule”: Why Your Hallway Consoles Need to Go Right Now?
Clear doorways are only half the battle. The path leading to and from that door is just as important. Hallways are the arteries of a home, and when they are clogged, the entire house becomes dysfunctional for a wheelchair user. The most common culprits are pieces of furniture that we barely notice: slim console tables, decorative planters, or shoe racks. While they may only stick out 12 to 18 inches from the wall, they create dangerous “pinch points” that can make navigation impossible.
To understand why, you need to think about turning radius. It’s not enough to have a hallway that’s wide enough for the chair to pass through in a straight line. The user also needs room to turn into doorways. To ensure proper wheelchair maneuverability, you must maintain a minimum 5-foot (60-inch) turning radius, especially in T-intersections or L-shaped halls. A console table can easily reduce a 48-inch-wide hallway to a 30-inch passage at one critical point, completely eliminating the space needed to pivot.
This overhead view clearly illustrates how even a slim piece of furniture can create an impassable bottleneck.
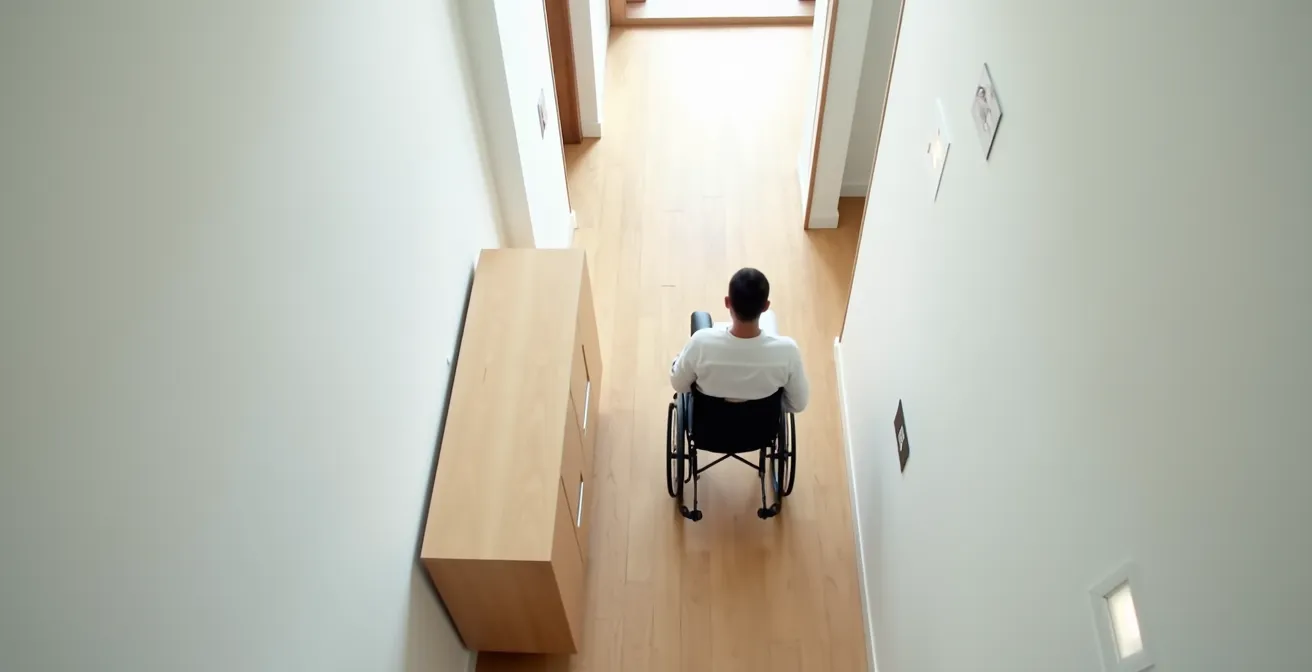
This brings us to the “2-Foot Rule,” a simple but effective guideline for any homeowner: nothing should be placed on the floor that protrudes more than 4 inches into any hallway or walkway that is less than 48 inches wide. While 2 feet (24 inches) might seem like an extreme clearance to demand, it serves as a powerful mental model. Look at your hallway. Is there at least a 2-foot clear path past every single object? If not, that object is a potential barrier. This simple rule forces you to see your home through the eyes of a wheelchair user and prioritize clear paths over decoration.
Key takeaways
- The simplest, cheapest, and first solution to a narrow doorway is to swap standard hinges for offset hinges, which can instantly add up to 2 inches of usable width.
- Always measure the “clear-span width” (the actual open space) rather than the raw doorway opening to understand your true clearance.
- If you must prioritize modifications, focus on the bathroom door first; its accessibility is a matter of daily dignity and critical emergency safety.
How to Design an Open Floor Plan That Accommodates a Wheelchair Before You Need One?
The most effective way to ensure long-term accessibility is to plan for it before it becomes a necessity. This proactive approach, known as Universal Design, is about creating spaces that work for everyone, regardless of their age, size, or ability. Instead of retrofitting a home with costly and often-compromised solutions, Universal Design integrates accessibility so seamlessly that it’s invisible to the casual observer but invaluable to someone who needs it.
For those building a new home or planning a major renovation, this is the perfect opportunity to future-proof your living space. An open floor plan is a great start, as it naturally eliminates many of the tight hallways and narrow doors that plague older homes. However, an “open” plan isn’t automatically an “accessible” plan. True accessibility lies in the details: ensuring continuous flooring without thresholds, creating intentional 60-inch turning circles in key areas like the kitchen, and planning for the future installation of support features.
One of the smartest Universal Design “hacks” is to add plywood backing inside the walls of bathrooms and hallways during construction. This simple, cheap step provides a solid anchor for installing grab bars exactly where you need them in the future, without having to search for studs. It’s the ultimate example of planning ahead. These principles help people remain in their homes comfortably and safely as they age, a concept known as “aging in place.”
Here is a checklist of Universal Design features to consider for a wheelchair-ready home:
- Install continuous flooring materials like LVP or hardwood to eliminate all thresholds between rooms.
- Design kitchen islands with dual-height sections (a standard 36-inch counter and a lower 30-inch accessible surface).
- Incorporate 60-inch turning circles as deliberate open spaces within room layouts, especially in the kitchen and main bedroom.
- Position furniture groupings to create wide, clear pathways rather than obstacles.
- Choose lever-style door handles and faucets over round knobs from the very beginning.
- Plan for electrical outlets and light switches to be placed at accessible heights, typically between 18 and 48 inches from the floor.
Now that you’re armed with these clever, cost-saving strategies, the next logical step is to take action. Start by walking through your home with a tape measure and a critical eye, using the 5-step assessment plan. Identify your most problematic doorway—likely the bathroom—and consider if the simple, powerful offset hinge is the right first move for you.