
In summary:
- Most single-cane instability stems from incorrect height adjustment, improper handle type, or poor usage technique, not a fundamental flaw in the cane itself.
- Mastering the setup of your current cane—from height to handle to tip condition—is the first and most critical step in fall prevention.
- Shoulder, back, or wrist pain is a key indicator that your cane is improperly fitted, not necessarily that you need a different type of cane.
- Only after optimizing your single-point cane and still feeling you are past your personal “stability threshold” should a quad cane be considered.
That unnerving feeling of a cane tip slipping on a smooth floor or the nagging ache in your shoulder after a short walk can be more than just an annoyance; it’s a warning sign. For many, the immediate conclusion is that their single-point cane is no longer sufficient and it’s time to upgrade to the wider, more stable base of a quad cane. But this assumption often skips a crucial diagnostic step. The vast majority of stability and comfort issues don’t originate from the cane’s category but from its setup and use. A single-point cane is a precision instrument for balance, and when calibrated incorrectly, it can create instability rather than prevent it.
Before you decide you need more support, you must first ask: “Am I getting the maximum possible support from the tool I already have?” The difference between a trusted stability partner and a hazardous liability often lies in a few millimeters of height, the angle of a handle, or the worn-out tread on a rubber tip. This guide is designed for the user who feels their cane is failing them. We will move beyond the superficial advice and delve into the biomechanics of cane use. We’ll explore why height is measured with shoes on, how handle design distributes force, and why the most critical safety feature might be a tiny piece of rubber that costs less than a cup of coffee. By mastering these fundamentals, you can accurately determine if your needs have truly surpassed the capabilities of a single-point cane, or if a few simple adjustments can restore your confidence and safety.
This article provides a comprehensive checklist to audit your current setup. By understanding the science behind each component, you can transform your cane from a source of frustration into a seamless extension of your body.
Summary: A Deep Dive into Single-Point Cane Mastery
- Why Your Cane Height Should Be Measured with Your Shoes On?
- Offset vs. Fritz Handle: Which Design Reduces Wrist Strain for Heavy Users?
- Opposite Side Rule: Why You Must Hold the Cane on Your “Good” Side?
- Wood vs. Patterned Aluminum: Can a Cane Be a Fashion Statement?
- Ice Tips and Wide Bases: How to Adapt Your Cane for Winter Walking?
- When to Replace Tips: The Danger of smooth Rubber on Wet Pavement
- Socks with Grips vs. House Shoes: Which Provides Better Stability on Hardwood?
- Why Your Shoulders Hurt After Using a Standard Cane for Only 20 Minutes?
Why Your Cane Height Should Be Measured with Your Shoes On?
The single most important factor for both stability and long-term comfort is correct cane height. An incorrectly sized cane doesn’t just feel awkward; it actively works against your body’s natural alignment. A cane that is too tall forces your shoulder to hike up, causing strain in the shoulder and neck. A cane that is too short forces you to stoop, leading to back pain and a compromised posture that can actually increase your fall risk. The goal is to achieve biomechanical harmony, where the cane supports your natural gait rather than altering it.
This is why the measurement must be taken while wearing your everyday walking shoes. The height of your shoe’s sole directly impacts the final measurement, and even a half-inch difference can be significant. The standard medical guideline is to stand up straight with your arms hanging naturally at your sides. The top of the cane handle should align with the crease of your wrist. This positioning ensures that when you hold the cane, your elbow has a slight, natural bend of about 15 to 20 degrees. This angle allows your arm to absorb shock and support weight effectively without locking the elbow or straining the shoulder. If you frequently switch between shoes with different heel heights, such as sneakers and dress shoes, an adjustable cane is a wise investment to maintain perfect sizing in any situation.
Offset vs. Fritz Handle: Which Design Reduces Wrist Strain for Heavy Users?
The handle is your primary interface with the cane, and its design dictates how your body weight is transferred through your hand, wrist, and arm. For users who place significant weight on their cane, a standard “tourist” or crook handle can concentrate pressure directly onto the wrist joint, leading to pain and fatigue. More ergonomic designs are engineered specifically to improve force distribution across the palm, protecting your joints.
The Offset handle is a prime example of superior ergonomic design. It features a distinct bend near the top that centers the user’s weight directly over the cane shaft. This alignment prevents the cane from wanting to “tip” and allows the force to travel straight down, reducing the twisting torque on the wrist. This makes it an excellent choice for individuals who rely heavily on their cane for weight-bearing support. The Fritz handle, developed in the 19th century for arthritis sufferers, offers a different benefit: its open, flattened design eliminates the pressure points of a traditional crook handle, allowing the fingers to rest comfortably without being forced into a tight grip.
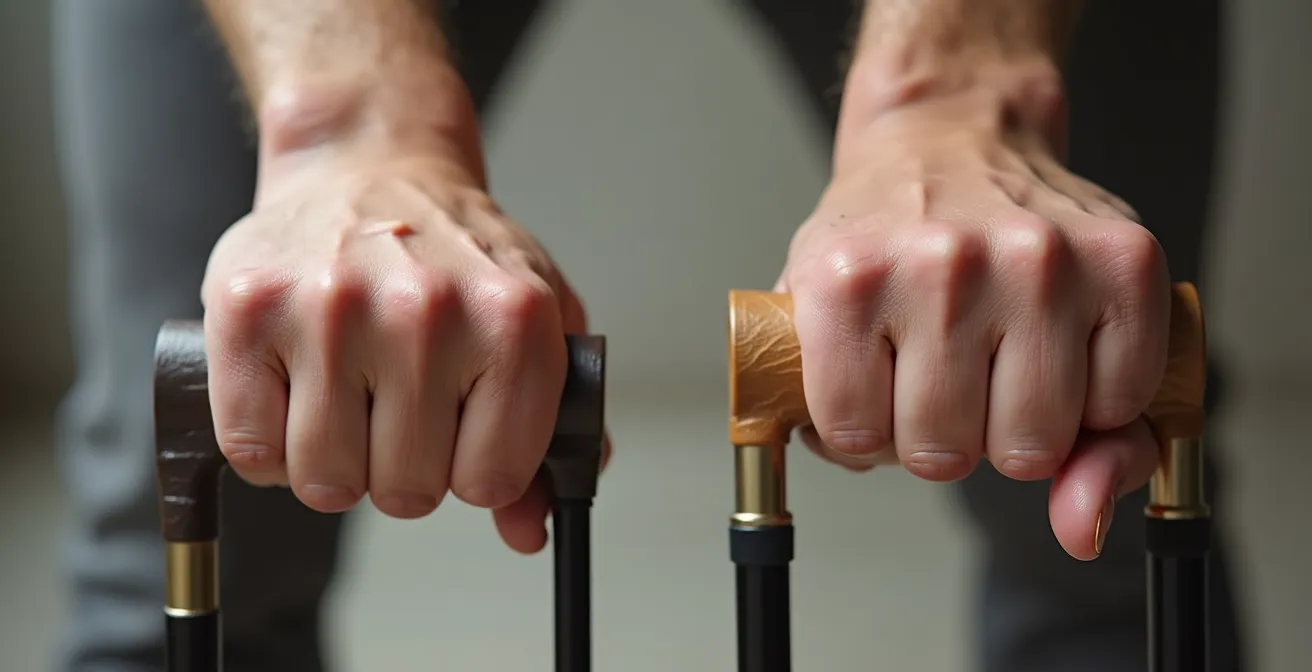
As the image above demonstrates, the choice of handle is not merely about comfort but about long-term joint health. For people who use their mobility aid for several hours a day, an ergonomic handle allows the cane to function as a natural extension of the arm, minimizing the discomfort that often accompanies prolonged use. It transforms the act of holding the cane from a point of strain into a source of stable, painless support.
Opposite Side Rule: Why You Must Hold the Cane on Your “Good” Side?
One of the most common and dangerous mistakes in cane use is holding it on the same side as the injury or weakness. While it may feel intuitive to “prop up” the sore leg, this disrupts your body’s natural walking rhythm and reduces the cane’s effectiveness. The correct method is to hold the cane in the hand opposite your “bad” leg. This technique is rooted in achieving biomechanical harmony with your natural gait.
The reason for this is beautifully simple, as explained by experts in orthopedics. Ventura Orthopedics notes how this method replicates the body’s innate coordination:
When humans walk, we stride with our feet and swing our hands at the same time. But when we stride with our left foot, we swing with our right hand; when we stride with our right foot, we swing with our left hand. Handling a cane in the hand opposite our injury replicates this natural arm movement, giving your hand an opportunity to absorb some of your weight while you walk.
– Ventura Orthopedics, How to Use a Cane Safely and Effectively
By following this rule, you create a wider and more stable base of support. As you step forward with your weaker leg, you move the cane forward simultaneously. Your “good” leg and the cane now form two points of a stable triangle, effectively sharing the load that would otherwise be borne by your affected side. This method not only provides superior stability but also promotes a more normal walking pattern, preventing the development of secondary issues like hip or back pain from an unnatural, limping gait.
Wood vs. Patterned Aluminum: Can a Cane Be a Fashion Statement?
For many, a walking cane is perceived solely as a medical device, often associated with a loss of vitality. However, a growing movement seeks to reframe the cane as an expressive extension of one’s personal style. Choosing a cane that you find aesthetically pleasing can significantly reduce stigma, boost confidence, and increase the likelihood that you’ll use it consistently, which is the ultimate goal for safety. The material and design of your cane say as much about you as your choice of a watch or a handbag.
The materials available today go far beyond the standard-issue aluminum cane. Each material offers a different functional and stylistic profile:
- Wood: Timeless and classic, wooden canes offer a warm, traditional feel. They are perfect for formal occasions and can be carved into intricate designs, making them a true piece of craftsmanship.
- Aluminum: Lightweight, durable, and often adjustable, aluminum is the workhorse material. Its true strength lies in its versatility, as it can be finished in a vast array of colors and patterns, from subtle florals to bold geometric prints.
- Carbon Fiber: The high-tech option, carbon fiber is exceptionally strong yet incredibly light, making it ideal for active users or those who need long-term support without the burden of extra weight.
- Lucite: For the fashion-forward, transparent Lucite canes make a modern, eye-catching statement. They are surprisingly strong and offer a unique, minimalist aesthetic.
A cane does not have to be a drab, clinical accessory. Coordinating a cherry wood cane with leather shoes or choosing a brightly patterned aluminum cane to complement a summer outfit can transform the device from a necessity into a deliberate style choice.
Ice Tips and Wide Bases: How to Adapt Your Cane for Winter Walking?
A standard rubber-tipped cane that provides perfect stability on a dry sidewalk can become a liability on ice, snow, or wet leaves. The key to year-round safety is not to abandon your cane in bad weather, but to adapt it to the environment. Modern cane accessories allow you to customize your single-point cane for virtually any terrain, especially the treacherous conditions of winter.
The most crucial winter adaptation is an ice tip. These attachments typically feature one or more sharp steel prongs that can be flipped down to grip ice and packed snow, dramatically reducing the risk of slipping. Many designs are retractable, allowing you to engage the prongs only when outdoors and flip them up when you go inside to prevent damage to floors. This single accessory can be the difference between staying homebound and confidently navigating winter errands.
Beyond ice tips, other accessories can boost your stability:
- Wide or Quad Bases: If you don’t want to commit to a full quad cane, you can purchase a wider, more flexible base attachment for your single-point cane. These provide a larger footprint for better stability on soft surfaces like snow.
- Pivoting Tips: All-terrain tips with a pivoting base maintain more contact with the ground on uneven surfaces, providing a more secure grip on bumpy, frozen terrain.
- Self-Standing Tips: While not exclusively for winter, a wider, self-standing tip can be very convenient when you need to free your hands, preventing you from having to precariously hook your cane over a chair or counter.
By building a small arsenal of adaptable tips, you can ensure your single-point cane remains a reliable partner in any season.
When to Replace Tips: The Danger of smooth Rubber on Wet Pavement
The small rubber tip at the bottom of your cane, also known as a ferrule, is the single most critical safety component. It’s the only part of the cane that makes contact with the ground, and its entire purpose is to provide grip through friction. Over time, with every step, this rubber wears down. A worn, smooth tip has a dangerously low friction coefficient, especially on wet, smooth surfaces like tile floors, polished concrete, or rain-slicked pavement. Trusting your weight to a cane with a bald tip is equivalent to driving a car with bald tires on an icy road—it’s an accident waiting to happen.
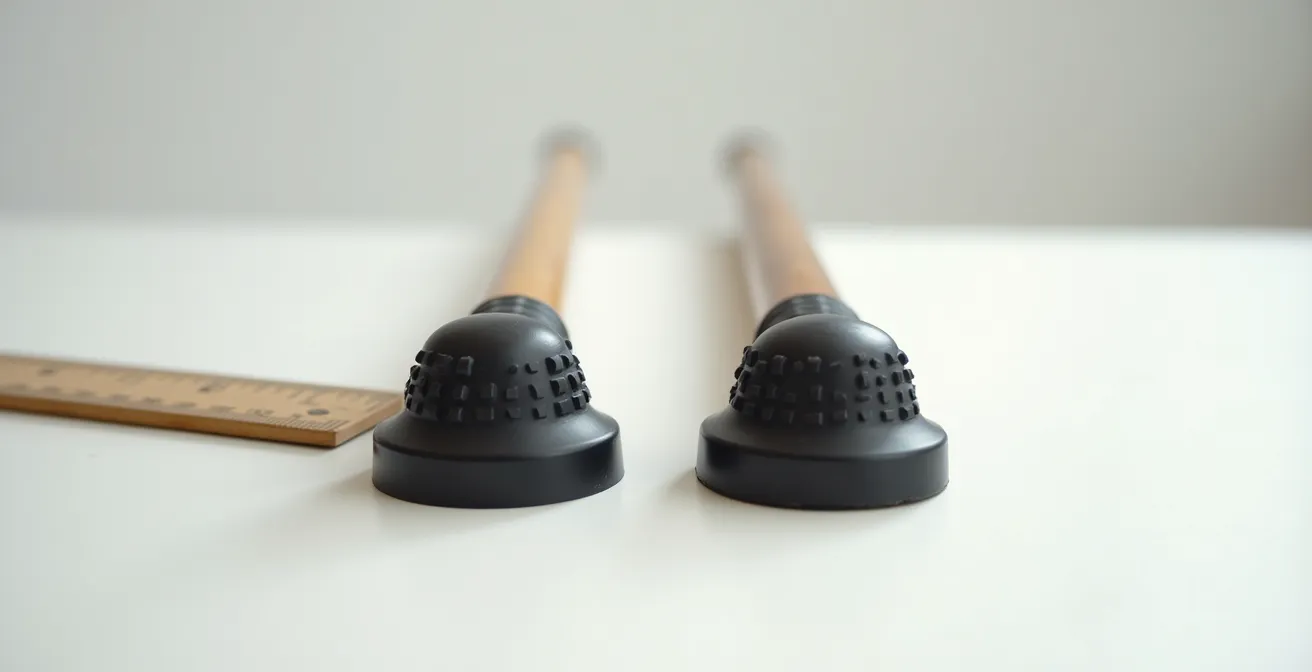
As the visual comparison shows, a new tip has deep, defined treads designed to channel away water and grip the surface. A worn tip is smooth and offers almost no purchase. Regular inspection is non-negotiable. You should check the tip at least weekly for signs of wear. Look for thinning at the base, cracks, tears, or an uneven wear pattern. According to durability testing, cane tips can last around 5 to 6 months, but this varies greatly depending on your weight, how often you use the cane, and the types of surfaces you walk on. It is a best practice to always carry a spare tip with you. Replacing a tip is an inexpensive and simple action that provides an enormous return in safety and peace of mind.
Socks with Grips vs. House Shoes: Which Provides Better Stability on Hardwood?
Your stability at home doesn’t just depend on your cane; it’s a system that includes your choice of footwear. Hardwood, tile, and laminate floors are particularly unforgiving surfaces. While gripper socks seem like a safe choice, they often provide a false sense of security and can even increase risk in certain situations. The most significant danger indoors is not necessarily the surface itself, but the transition between different surfaces. A gripper sock that works well on hardwood can suddenly catch on the edge of a rug, leading to a trip.
Physical therapists recommend choosing task-based footwear for optimal indoor safety. A well-fitting, rubber-soled shoe with a closed back will always provide the most stability. However, for general use around the house, a good house shoe is often a more practical and comfortable choice. The key is to avoid regular socks, slippers with no back, or going barefoot on hard floors. The following table provides a clear hierarchy of indoor footwear for stability.
This comparative analysis, based on data from elder care safety experts, highlights the superior stability of structured footwear. As a general rule from an analysis of indoor fall risks, anything that can easily slip off your foot is not a safe choice when mobility is a concern.
| Footwear Type | Stability Rating | Best Use Case |
|---|---|---|
| Well-fitting shoe with rubber sole | Best | All indoor activities, especially carrying items |
| House shoe with closed back | Good | Extended walking, mixed surfaces |
| Gripper socks | Moderate | Short walks, sitting activities |
| Bare feet | Fair | Carpeted surfaces only |
| Regular socks | Worst | Not recommended on hard floors |
Key Takeaways
- Chronic shoulder or wrist pain is a red flag for an improperly sized or ill-suited cane, not necessarily a need for a quad cane.
- A diagnostic checklist can help you pinpoint the exact cause of cane-related pain, from height and handle to grip habits.
- Mastering your single-point cane’s setup is the most effective way to maximize stability and prevent pain before considering other options.
Why Your Shoulders Hurt After Using a Standard Cane for Only 20 Minutes?
Persistent shoulder, back, or wrist pain after using a cane is not a normal side effect of aging or mobility challenges—it is a clear signal that your equipment is working against you. The most common culprit is incorrect height. As noted by mobility experts, a too-tall cane can throw off balance, while a too-short cane can cause stooping and back pain. If your shoulder feels constantly “hiked up” or your elbow is completely straight while walking, your cane is too tall. If you find yourself hunched over to use it, it’s too short. Both scenarios disrupt your posture and place unnatural stress on your joints.
Another frequent cause of pain is a “death grip.” Many users, feeling insecure, grip the handle with excessive force. This constant muscle tension radiates up the arm and into the shoulder. This habit is often a symptom of other problems: a non-ergonomic handle that forces an awkward grip, a cane that is too heavy, or a general feeling of instability that an overly tight grip cannot fix. The solution lies in addressing the root cause, whether that means switching to an offset handle that promotes better force distribution or correcting the cane’s height to restore confidence. By systematically troubleshooting your setup, you can often eliminate pain and rediscover your cane as a tool for comfort, not a source of it.
Your Action Plan: Quick Diagnostic for Cane-Related Pain
- Check Height: Stand straight and let your arm hang. Is the top of the handle level with your wrist crease? If your shoulder is raised or your elbow has more than a 30-degree bend, it’s too tall. If you’re stooping, it’s too short.
- Evaluate Handle: Look at your hand. Are there red pressure marks? An offset or Fritz handle might be better for your grip strength and hand condition than a standard crook handle.
- Assess Habit: As you walk, consciously relax your hand. Are you death-gripping the handle? Remind yourself to put light, steady pressure, not to squeeze with all your might.
- Perform Stretches: Throughout the day, take breaks to perform simple door frame stretches for your chest and shoulder, and gentle pendulum swings with your arm to relieve joint tension.
- Confirm Proper Use: Double-check that you are holding the cane on your “good” side, opposite your weaker leg, to ensure a natural and stable gait.
Now that you have a complete framework for optimizing your single-point cane, you are in the best position to assess your true stability needs. If, after making all these adjustments, you still feel that your balance is compromised or that your mobility needs require a wider, more stationary base of support, then it is the right time to discuss transitioning to a quad cane with your doctor or physical therapist. Making this decision from a place of knowledge, rather than frustration, ensures you are choosing the right tool for the right reason.