The safest floor is not a product you buy, but a system you manage by controlling the physics of friction.
- Anti-slip treatments chemically alter a tile’s surface to increase its microscopic grip, but their effectiveness depends on proper cleaning.
- Mats provide a barrier but can become trip hazards themselves and require a multi-stage system to be effective at trapping moisture.
Recommendation: First, test and correct your floor’s existing slipperiness caused by cleaning residue. Only then, evaluate treatments or mat systems based on your home’s specific traffic and risk areas.
The sudden, heart-stopping feeling of a foot sliding on a wet kitchen floor is a universal experience for homeowners with tile or hardwood. The immediate reaction is often to search for a quick fix: a rubber mat or perhaps an anti-slip spray seen online. While these solutions are the most commonly discussed, they address the symptom, not the underlying cause of the slip.
Most advice focuses on either covering the floor or wearing better shoes, but it rarely delves into the fundamental science of what makes a surface safe. The real problem isn’t just the water; it’s the loss of friction at a microscopic level. This can be caused by the floor’s inherent properties, the type of footwear worn, or, most insidiously, a nearly invisible film left behind by common cleaning products.
This guide takes a different approach. Instead of simply comparing products, we will deconstruct the physics of a slip. We will treat your home’s floor not as a passive surface, but as an active system where tile, footwear, and maintenance interact. Understanding this system is the key to moving beyond temporary fixes and engineering genuine, long-lasting safety.
By exploring the science of friction, the hidden dangers of cleaning agents, and the proper way to specify and test materials, you will learn to think like a safety specialist. This article provides the technical knowledge to audit your own home and make an informed decision that truly reduces the risk of falls.
Summary: Anti-Slip Treatments vs. Mats: A Technical Breakdown for a Safer Wet Kitchen Floor
- Socks with Grips vs. House Shoes: Which Provides Better Stability on Hardwood?
- Why Your Floor Cleaner Might Be Creating a Slippery Film Over Time?
- The “Wet Boots” Zone: How to Trap Moisture Before It Hits the Living Room Tile?
- Metal vs. Rubber: Which Threshold Strip Reduces Slipping Between Carpet and Tile?
- How to Perform a “Slide Test” to Check Your Bathtub’s Safety Coating?
- Why Walking Barefoot at Home Is the Risk That Leads to 50% of Diabetic Foot Ulcers
- How to Read Tile Specs: What Does “COF > 0.42” Actually Mean for Your Safety?
- Cork, Vinyl, or Rubber: Which Flooring Material Is Best for Reducing Impact if You Fall?
Socks with Grips vs. House Shoes: Which Provides Better Stability on Hardwood?
The foundation of slip prevention begins with the point of contact: your footwear. On smooth, hard surfaces like hardwood or laminate, the choice between socks and shoes is not a matter of comfort, but of physics. Socks, even those with silicone “grips,” offer minimal structural support. The soft fabric can bunch and twist, and the small grip dots provide inconsistent surface contact, reducing their effectiveness. They fail to protect the foot from impact or sharp objects and offer poor stability for the ankle.
House shoes or dedicated indoor slippers are technically superior for one primary reason: a full-coverage, patterned rubber sole. Unlike grip socks, a proper shoe sole provides a large, stable contact patch with the floor. The material is engineered for a high coefficient of friction, and the tread patterns are designed to channel away micro-particles of dust or debris that can act like ball bearings under a soft sock. Furthermore, a well-fitting shoe with a closed heel and low profile prevents the foot from sliding within the footwear itself, which is a common cause of instability.
For optimal safety, footwear should be treated as essential equipment. Choose a shoe with a rubber-soled, low-heeled design. It must fit properly, providing complete foot protection with a closed toe and heel. Most importantly, avoid walking in socks alone on any hard surface, as this removes a critical layer of engineered friction from your personal safety system.
Why Your Floor Cleaner Might Be Creating a Slippery Film Over Time?
You clean your floors to make them safer, but what if your cleaner is achieving the exact opposite? Many popular, mass-market floor cleaning products are formulated to produce a high-gloss shine. They achieve this by depositing a microscopic layer of acrylic polymers or waxes that fill in the natural pores and textures of your flooring. While this looks clean, it drastically lowers the floor’s natural grip, effectively creating a built-in slipping hazard.
Case Study: The Hidden Danger in Commercial Kitchen Cleaners
A comprehensive study of commercial kitchen floors revealed this exact phenomenon. It found that many popular cleaners contain polymers that create a glossy appearance by filling microscopic pores in the flooring. This smoothing effect significantly lowers the natural Coefficient of Friction (COF), transforming a textured, safe floor into a smooth, hazardous one, especially in high-moisture environments. The desire for a shiny finish directly compromised the floor’s engineered safety features.
This residue film is often invisible and builds up over time with each cleaning. Water from a wet shoe or a spill doesn’t make contact with the grippy tile anymore; it sits on top of this smooth polymer layer, creating a perfect scenario for hydroplaning. Before investing in mats or expensive treatments, the first step is to diagnose and remove this contaminant film. A simple test with isopropyl alcohol can reveal if your floor has this buildup.
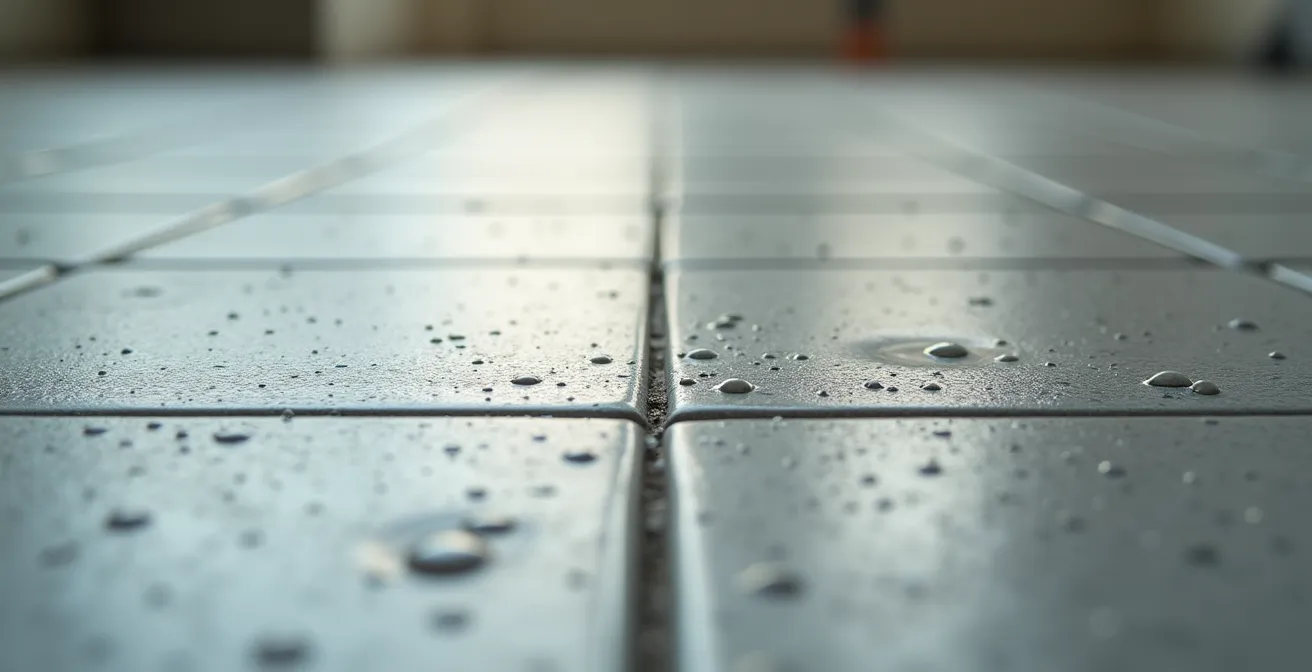
The image above illustrates the difference. A clean surface has texture and pores that provide grip, while a surface with film buildup is smooth and reflective. Restoring your floor’s natural friction requires stripping this film with a pH-neutral, non-film-forming cleaner. This single act can often transform a dangerously slick floor back into a safe surface without any other intervention.
Action Plan: Residue Detection and Surface Reset
- Test for film buildup: Firmly wipe a small, out-of-the-way area with isopropyl alcohol on a clean white cloth.
- Check the cloth: Look for a yellow, waxy, or hazy residue, which indicates the presence of a polymer film.
- Strip the film: Use a pH-neutral, non-film-forming cleaner designed for your specific floor type to deep clean the entire surface.
- Choose a stripping agent: For ceramic tile, an ammonia-based solution can be effective, while vinyl may require a specialized stripping product.
- Maintain the surface: Switch to an approved non-residue cleaning product for all future cleaning to prevent the film from returning.
The “Wet Boots” Zone: How to Trap Moisture Before It Hits the Living Room Tile?
Even with pristine, residue-free floors, moisture tracked in from outside remains a primary slip hazard. According to the Consumer Product Safety Commission, over 2 million fall injuries per year are directly attributed to floors and flooring materials. A single doormat is often insufficient to combat this. An effective moisture-trapping strategy relies on a 3-mat system, creating a transition zone that cleans and dries shoes before they reach your main living areas.
This system works in stages, with each mat performing a specific function. The goal is not just to wipe, but to scrape, clean, and absorb. The first mat, placed outside, is the most aggressive. The second, at the threshold, is a combination mat. The final mat, just inside, performs the last drying function. This systematic approach ensures that by the time a person steps onto your interior tile or hardwood, their shoes are as dry as possible, minimizing the risk of a slip.
The table below breaks down the components and function of a professional-grade 3-mat entry system that can be adapted for residential use.
| Mat Type | Location | Primary Function | Material |
|---|---|---|---|
| Scraper Mat | Outdoor | Remove coarse debris | Rigid bristles/rubber |
| Wiper/Scraper | Threshold | Trap fine particles & moisture | Combination materials |
| Wiper Mat | Indoor entry | Final drying & absorption | Absorbent carpet/microfiber |
Implementing this system transforms your entryway from a simple doorway into a functional safety zone. It’s a proactive measure that contains the hazard at its source, preventing moisture from ever becoming a risk on your main floors.
Metal vs. Rubber: Which Threshold Strip Reduces Slipping Between Carpet and Tile?
The transition between two different flooring types, such as from carpet to tile, is a common location for trips and slips. The threshold strip, or transition strip, is meant to solve this, but the material choice has significant safety implications. A standard, smooth metal strip can become extremely slippery when wet, creating a new, concentrated hazard right in a high-traffic path. While durable, they often prioritize aesthetics over friction.
A rubber or high-traction vinyl threshold strip is technically the safer choice. Rubber inherently has a much higher coefficient of friction than smooth metal, especially in wet conditions. These strips are often designed with a fluted or textured surface, which further enhances grip and helps to scrape debris from shoe soles. They provide a clear visual and tactile cue of a change in flooring, prompting more careful foot placement. While metal strips are often low-profile, some rubber transitions can be slightly thicker, so it is crucial to select one with beveled edges to prevent it from becoming a trip hazard itself.
Research consistently shows that integrating slip-resistant elements at floor transitions is a proven safety measure. As highlighted by safety advocates, slip-resistant step edges and nonslip nosing have been proven to reduce falls. Applying this principle to floor-level transitions, a high-traction rubber strip serves the same purpose: it provides a secure point of contact during the critical moment a person shifts their weight from a soft, high-friction surface (carpet) to a hard, potentially low-friction one (tile).
How to Perform a “Slide Test” to Check Your Bathtub’s Safety Coating?
The bathroom is the epicenter of household falls, and the bathtub or shower floor is ground zero. Anti-slip treatments or factory coatings are designed to provide grip, but they can wear down over time or be compromised by soap scum and mineral deposits. A visual inspection is not enough; you must perform a regular tactile test to assess the surface’s true friction level.
A safe and effective method is the “Barefoot Heel-Push Test.” This is not an attempt to make yourself slip, but a controlled way to feel the surface’s resistance. It allows you to distinguish between a surface that “grabs” your heel versus one that allows it to “glide” smoothly. A gliding sensation is a clear warning that the surface’s slip resistance is compromised and requires attention. With proper application and maintenance, certified anti-slip treatments have shown over 5+ years of consistent slip resistance, but this longevity is dependent on regular verification.
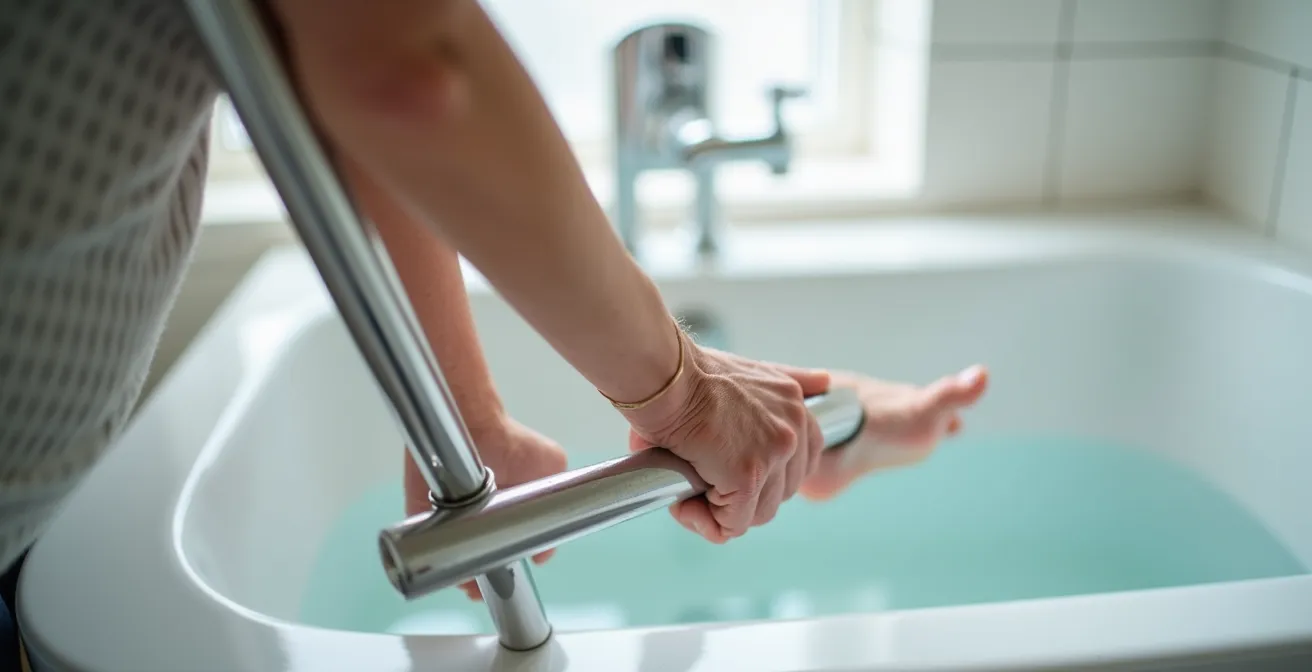
To perform the test safely, follow this specific protocol:
- Hold onto a secure grab bar or a sturdy part of the shower frame before beginning. Your balance must be fully supported at all times.
- Wet the tub or shower surface with water, as it would be during normal use.
- Gently place your bare heel on the wet surface.
- Apply light, controlled forward pressure with your heel, feeling for the immediate sensation. You are testing for initial resistance, not trying to initiate a full slip.
- Assess the feeling: a secure “grab” indicates good friction, while a smooth “glide” indicates a hazardous surface that needs treatment or deep cleaning.
- Perform this test quarterly as part of a routine home safety audit.
Why Walking Barefoot at Home Is the Risk That Leads to 50% of Diabetic Foot Ulcers
For most people, walking barefoot at home is a simple comfort. For individuals with diabetes, it represents a significant and often underestimated risk. Diabetic neuropathy, a common complication, can cause a loss of sensation in the feet. This means a small cut, splinter, or blister from stepping on an unseen object might go completely unnoticed. Left untreated, these minor injuries can quickly escalate into serious infections and non-healing wounds known as foot ulcers. Shockingly, a large percentage of these injuries occur in the perceived safety of one’s own home.
The risk is not just from injury but also from a lack of protection. Being barefoot provides zero impact absorption and no barrier against surface irregularities or temperature extremes. It exposes the skin directly to everything on the floor. Health authorities are unequivocal in their guidance on this matter. The Centers for Disease Control and Prevention offers a clear and non-negotiable directive for diabetic foot care.
Never go barefoot. Always wear shoes and socks or slippers, even inside, to avoid injury. Check that there aren’t any pebbles or other objects inside your shoes.
– Centers for Disease Control and Prevention, CDC Diabetes Foot Care Guidelines
This advice is part of a broader, essential protocol of daily foot care. In addition to always wearing protective footwear, a daily inspection is critical to catch problems before they become severe. This includes checking all surfaces of the feet, feeling for temperature changes, and ensuring shoes are free of internal seams or foreign objects that could cause irritation. For individuals with diabetes, the floor is a risk zone, and proper footwear is the most critical piece of personal protective equipment.
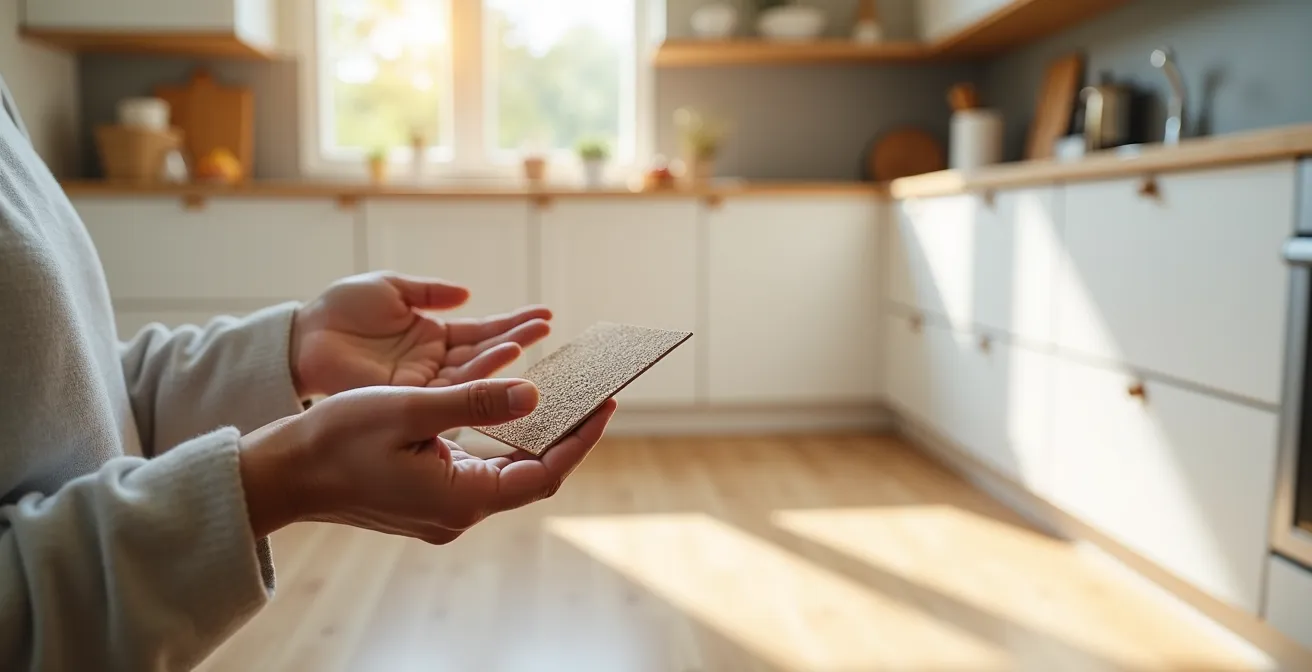
How to Read Tile Specs: What Does “COF > 0.42” Actually Mean for Your Safety?
When selecting tile for a kitchen, bathroom, or entryway, aesthetics often take priority. However, the most important specification for safety is not the color or pattern, but a technical number called the Coefficient of Friction (COF). This value measures how much force is required to move an object across a surface. A higher COF means more grip and a lower risk of slipping. But not all COF measurements are created equal.
The industry has moved from an older standard, Static COF (SCOF), which measures the force needed to *start* a slip from a standstill, to a much more relevant metric: Dynamic COF (DCOF). DCOF measures the friction of a surface when an object is already in motion, which more accurately reflects the physics of a walking person trying to stop a slip in progress. For surfaces that are expected to be walked on when wet, the ANSI A326.3 standard requires that tile has a DCOF value of greater than 0.42. This number is your single most important safety benchmark when shopping for tile.
When you see “DCOF > 0.42” on a tile’s specification sheet, it is a certification that the product meets the minimum modern safety standard for wet environments. Anything less is not suitable for bathrooms, kitchens, or entryways.
| Measurement Type | What It Measures | Safety Threshold | Testing Condition |
|---|---|---|---|
| Static COF (SCOF) | Force to START a slip | 0.50-0.60 | Standing still |
| Dynamic COF (DCOF) | Force to STOP a slip in progress | 0.42 (wet) | Walking motion |
| High Traction | Enhanced safety margin | >0.50 | Kitchen/bathroom use |
Insisting on a tile with an adequate DCOF rating is the most fundamental step in engineering a safe floor. It is the proactive, built-in solution that provides a baseline of safety before any mats or treatments are even considered.
Key takeaways
- True floor safety is a system, not a single product. It involves managing the interaction between the floor surface, footwear, and cleaning methods.
- Many common floor cleaners create a slippery, invisible film that negates a floor’s natural grip. This must be tested for and removed first.
- The modern safety standard for tile in wet areas is a Dynamic Coefficient of Friction (DCOF) greater than 0.42. This specification is non-negotiable.
Cork, Vinyl, or Rubber: Which Flooring Material Is Best for Reducing Impact if You Fall?
While preventing a fall is the primary goal, we must also consider the “what if.” Should a fall occur, the flooring material itself plays a crucial role in the severity of the injury. Hard surfaces like ceramic tile or stone offer zero impact absorption, leading to a higher risk of fractures. Softer, more forgiving materials can significantly cushion a fall, a concept known as impact absorption. When choosing a new floor, especially for areas frequented by seniors or those with mobility challenges, this property is as important as slip resistance.
Cork, rubber, and certain types of luxury vinyl tile (LVT) are leaders in this category. Cork is naturally compressive due to its cellular structure, acting like a built-in cushion. Rubber offers excellent shock absorption and is extremely high-traction, which is why it’s used in playgrounds and gyms. A superior modern solution is LVT that is manufactured with a cork underlayment, combining the durability and easy maintenance of vinyl with the superior impact absorption of cork.
When evaluating these materials, it’s also important to consider their stability for mobility aids like walkers or wheelchairs. The table below compares the key safety properties of these fall-friendly flooring options.
| Material | Impact Absorption | Stability for Mobility Aids | Maintenance |
|---|---|---|---|
| Cork | Excellent cellular compression | Good balance | Moderate |
| Rubber | Very good shock absorption | Excellent grip | Easy to clean |
| LVT with Cork Underlayment | Superior combination | Excellent stability | Low maintenance |
Choosing a floor is a long-term safety decision. Balancing slip resistance, impact absorption, and maintenance requirements allows you to create an environment that is not only safer to walk on but also safer to fall on.
Ultimately, creating a safe home environment is an active process of risk management. It requires moving beyond the simple “mat vs. treatment” debate and adopting a systems-based approach. By understanding the science of friction, demanding materials that meet modern safety standards like a DCOF of >0.42, and eliminating hidden hazards like cleaner residue, you can engineer a floor that is inherently safer. The next logical step is to apply this knowledge by performing a systematic safety audit of your own home’s high-risk areas.